Liberty Blouse Pattern Trifecta
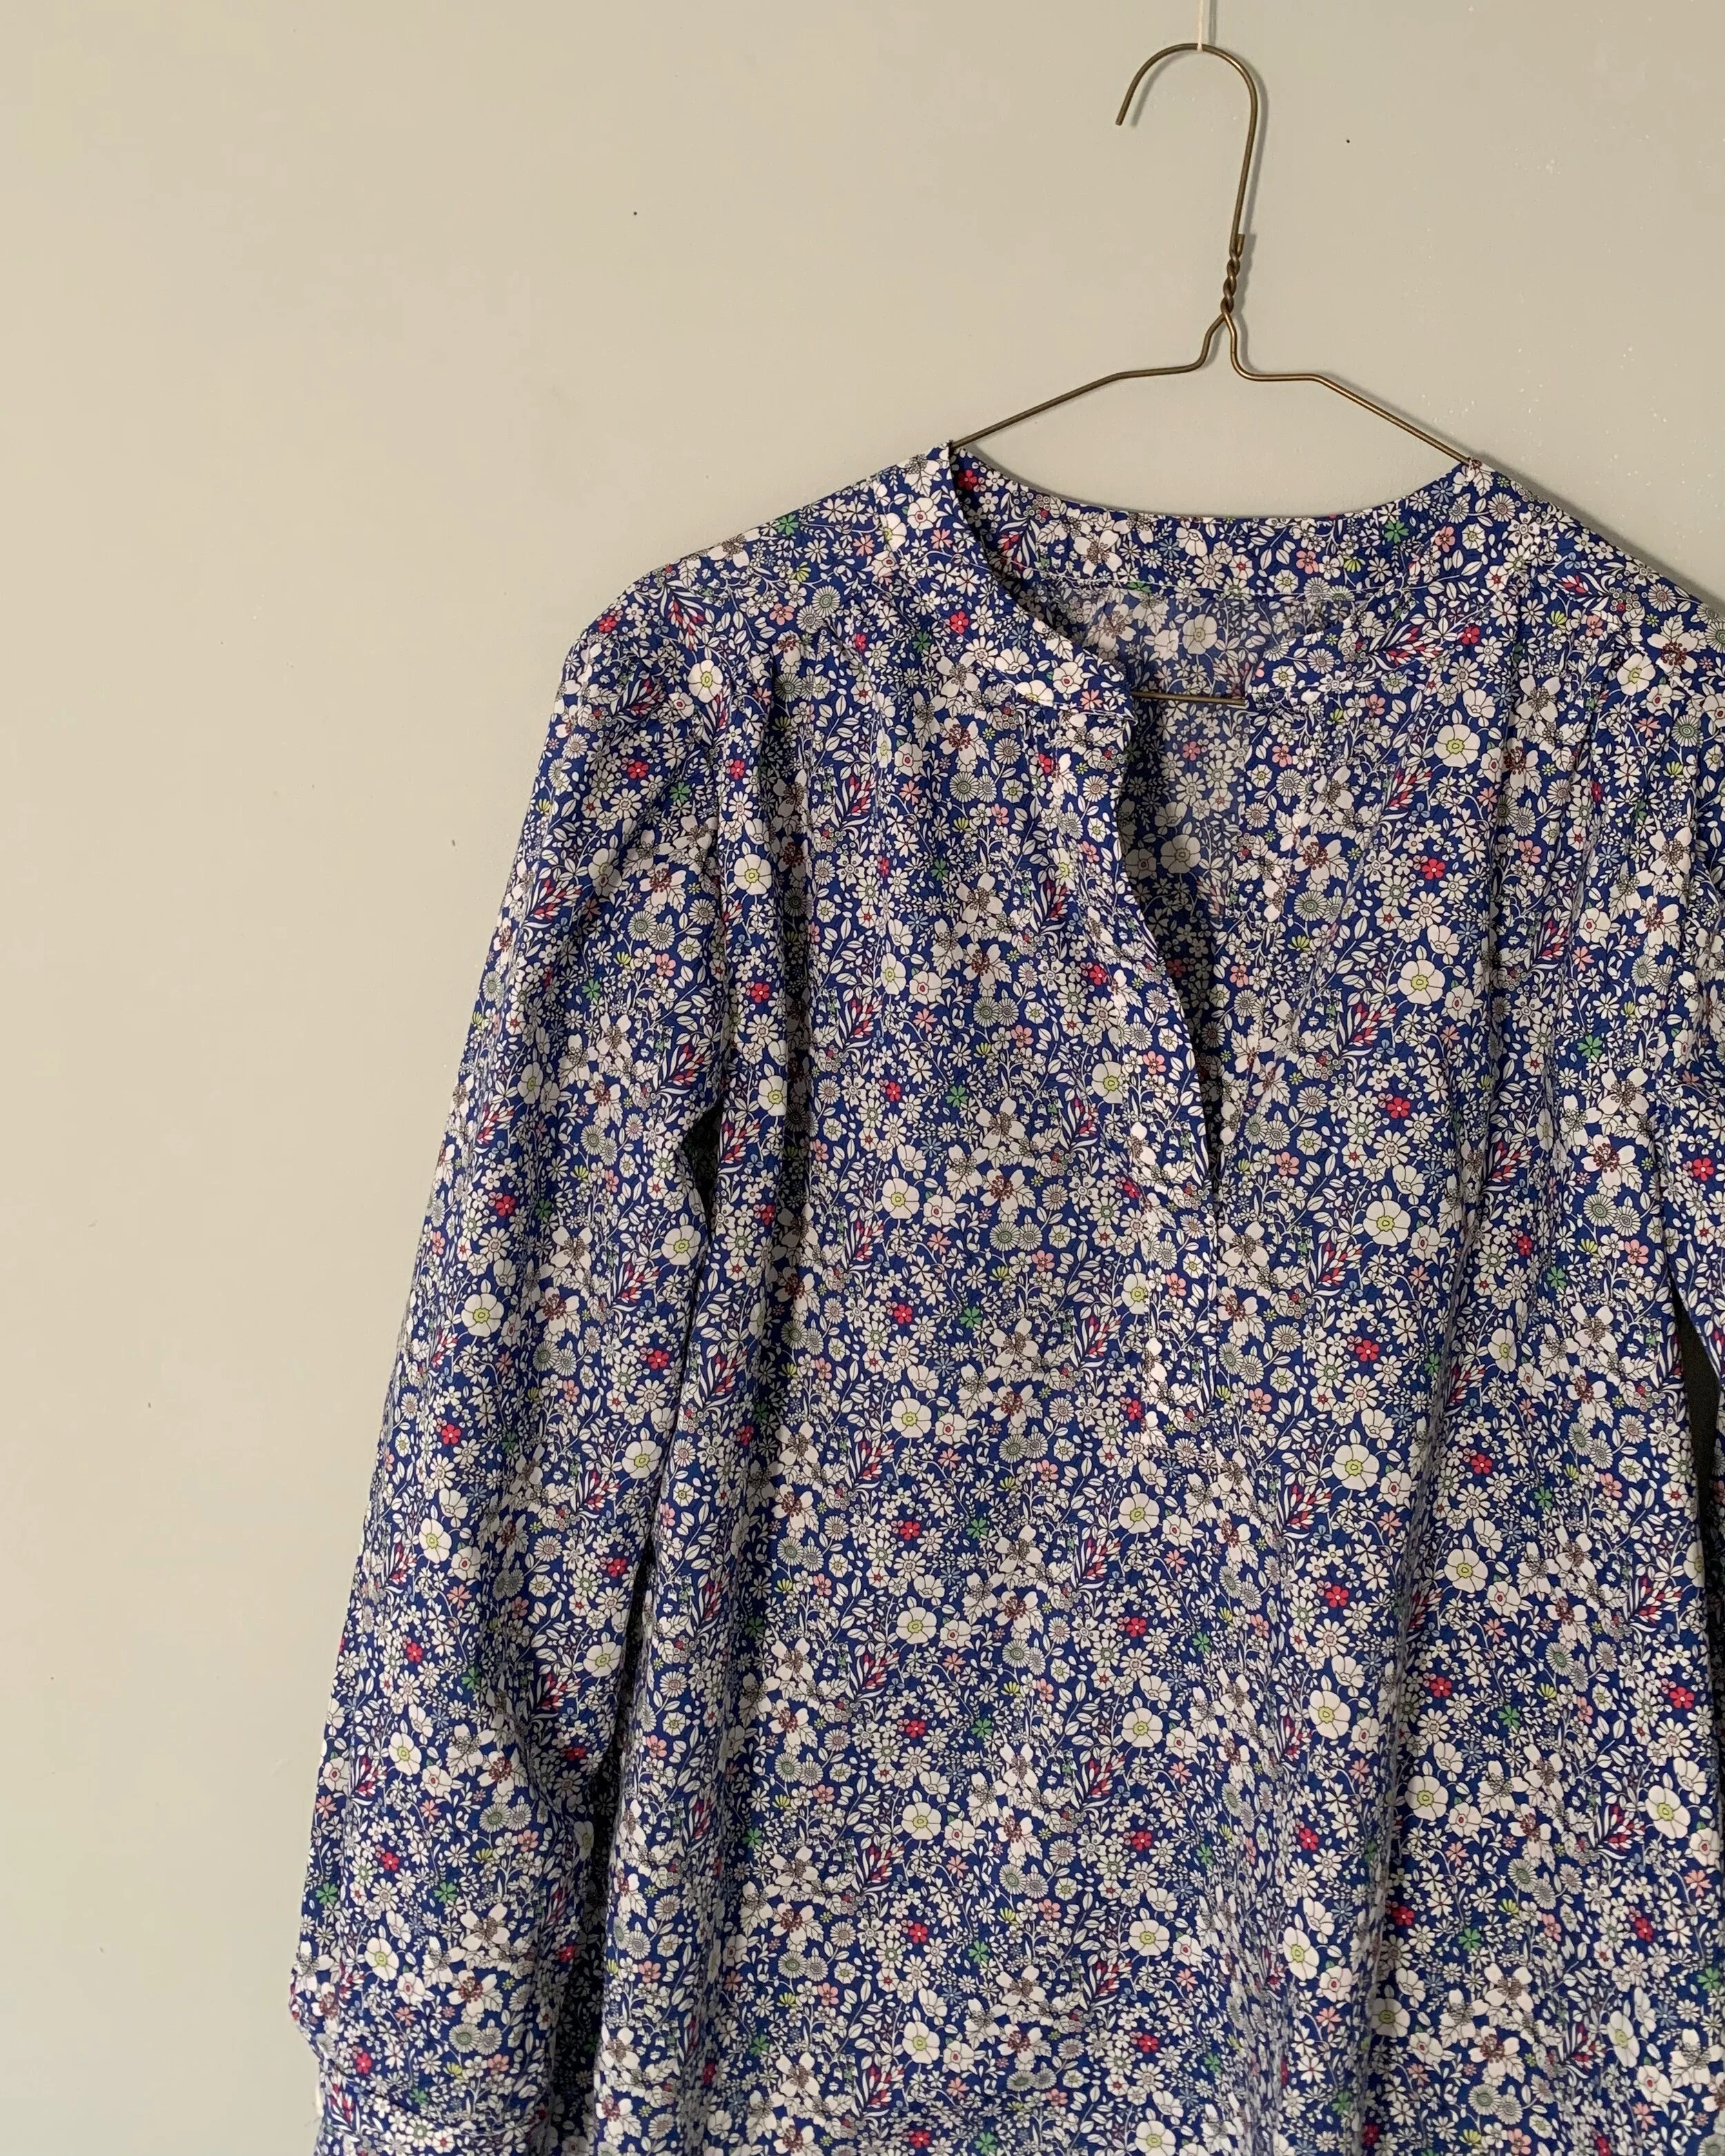
I have been making and wearing cotton shirts for ages.  They tend to fall into one of two camps: 1) the button down -sometimes these lean a bit to the stuffy/workwear side; and 2) the boxy top with sleeve variations -sometimes these lean simple and perhaps a little shapeless.  For this cotton top, I wanted a softer version of the standard button down.  I imagined a blouse with a collar band- but no pointy collar- an easy popover style with soft gathers and a bit of shape.  After scouring blouse patterns until I went a bit bleary eyed- I landed on not one, not two, but three patterns- to mash together for this Liberty project.  The bright side is that I already own all these patterns- which makes sense, because – well — the design elements were calling to me

IMG_1340.jpg

I like the collar band on McCalls 7360 – see how nice and flat it lays on the neckline!  But I don’t want darts and I want a wee bit fuller blouse, so I like the soft gathers front and back on the McCalls 7324. But- I don’t love the pleat in front on that pattern.  I also decided to pass on the two piece sleeve in both McCall’s patterns and prefer a simple (albeit pretty traditional) sleeve from the Grainline Archer.

IMG_1365.jpg

My pattern mashing steps are elementary.  I line up the shoulders and waist markings- in this case from McCalls 7324 and 7360. I used McCalls 7360 as the base -including collar and placket- and modified by adding fullness from 7324.  I used the entire back piece from 7324. The sleeve cap from McCalls two-piece sleeve was nearly identical to the Grainline Archer sleeve, so I simply cut the Grainline sleeve and cuff pieces.

It is not the perfect blouse- but it is getting close.

IMG_1341.jpg

Let’s take a moment to not only admire the great Liberty print, but extol the virtues of this Tana lawn.  Tana lawn is the perfect fabric for blouse making.  This cotton is woven so tightly, you never are in danger of fraying.  The fabric is lightweight but incredibly stable , all seams are simple.  French seams are also a breeze because there is no danger of slip sliding with this fabric.

IMG_1219.jpg

Parting comments are confessional- I made an ENORMOUS pattern matching mistake.  Kind of a forest for the trees issue.  In fact, I un-picked the placket and re-attached it because I originally put the placket fabric in upside down.  I think I stared at the fabric so intensely to determine what was up and what was down, that I TOTALLY missed the vertical design- see red flowers below. Oh man- I was devastated when I tried it on and noticed it. Sadly, my blouse is completely off.  There is absolutely no way to salvage this- I used up all of the fabric.  Liberty fabric is such an asset- this may get unpicked and transformed into something more perfect. But, I will wear it a few times as is- mostly to analyze this pattern trifecta for comfort and wearability.

IMG_1362.jpg

Pietra pants- with zip

So, I succumbed to the siren song of elastic waist pants, again.  The enticement of elastic waist pants is hard to ignore.  Who doesn’t want to live in stretchy waist accommodating comfort?   Yet, if I am looking for a pant that fits well and is complimentary- I find elastic waist pants prove as difficult as fitted pants to fit the bill.  Because, here’s the thing: all that fabric and ease- which provides so much comfort- is not super flattering gathered around my mid-section. I have not yet found an elastic waist pant pattern that I would make again- that is until I made up the Pietra pant which is part of the new Rome Collection by Closet Case.  I already have another pair on the cutting table.

IMG_0871.jpg

There were some obvious design elements that suggested the Pietra pant might be more flattering than my past elastic pant makes. I love the front seam and clever straight-cut pocket. Also, there is a flat front with elastic only in the back. Even so- I made several modifications to this pattern because - well it’s typical for me.  First, I took an inch off the top of the front and back. I like my pants to sit at my mid-section- not above.  I also reduced the waistband to accommodate 1 ½ inch elastic instead of 2 inch- partly because it was what I had on hand, and partly because that seemed wide enough.  I shortened the front crotch after checking for fit, because it was necessary.

IMG_1017.jpg

The most significant modification was adding an invisible zipper on the side- an idea first used and blogged about by Mia at Sewnorth here- thanks for the inspired idea!  When I tried the pants on for fit, I didn’t like all of the fabric and fullness in the rear.  So, I reduced the fullness by taking in the center back seam.  However, reducing the fullness made the pants a bit too tight to wiggle into them.  An invisible zipper solved the problem and makes the pants pretty perfect. See side zipper glam shot below.

IMG_1109.jpg
IMG_0962.jpg

I used a denim chambray from Lakes Makerie as a wearable toile, and while the fabric color and weight is fabulous, I worry they won’t be super sturdy.  That’s why I feel rushed to make another pair.

IMG_0847.jpg

The top is the trusty Colette Laurel without back darts.  The fabric is such a winning Scandi print that I found from Juniper Blue Textiles. The print is so cool- I didn’t want to distract from it with a more complicated pattern.

Sewcial Mashup Challenge with Vogue 1395

I am a longstanding pattern masher- aka: taking pattern pieces from separate patterns to create my own unique project. So, the sewcial mash up challenge hosted by Lori of Girls in the Garden and Lindsey at Inside the Hem this month is right up my alley. I had Rebecca Taylor Vogue 1395 in my pattern queue for several years- and this challenge was the inspiration I needed to FINALLY make this dress.  I have a few Rebecca Taylor patterns and I find her designs feminine and wearable.  This pattern has a versatile and slightly casual shape that is super appealing. I love the pull on and go style- with waist definition from those ties!   But, I read several reviews that recommended some significant modifications for the shoulders and armholes- including these reviews from the sensational sewists  Katie and Lauren.  I decided this pattern would be a good candidate for pattern mashing- specifically to change out the wide neckline and the back and shoulders.  I also wanted to add longish sleeves.

IMG_0616.jpg

I was determined to use patterns I had on hand for this mash up- so my mash-up includes the bodice front and back and sleeves from Simplicity 8737.  I actually made the v-neckline a wee bit deeper and wider than the Simplicity pattern piece and omitted any fastening in the back.  With a slightly deeper v-neck and the full bodice, I knew it would slip easily over my head without any fussy back closures. I omitted the neckband in the Simplicity view. I also skipped the big cuff and finished the bottom of the gathered sleeve with a narrow band.  I used the front facings from the Simplicity pattern.  The Vogue pattern uses bias binding for the v-neck, but I am partial to using facings.  I had to draft a back neck facing from the altered back bodice.

IMG_0699.jpg

There wasn’t a lot of expertise involved in combining bits and pieces of these patterns.  One mash up task was to make certain the top fit the bottom- or skirt.  I aligned both pattern bodice fronts and backs to make sure the fullness was similar and would match up with the Vogue skirt- and the patterns were remarkably similar.  But because the back on the original dress wraps to the front- I had to ever so slightly gather the back skirt to fit the back bodice. 

IMG_0742.jpg

The other tricky mash-up aspect was to figure out how to add ties.  I had to improvise on both the pattern and the construction/placement of the ties because they are attached to the bodice back in the Rebecca Taylor Vogue pattern.  I drew a pattern slightly scaled from the Vogue pattern shape and attached the ties in the side seams.

The fabric is a just-right rayon crepe from the Fabric Store- perfect weight and not too slippery.

IMG_0589.jpg

Merchant and Mills Foreman- For Son

My oldest turned 30!  This called for a special gift and the Merchant and Mills Foreman chore coat rose to the occasion. This is my first experience with a Merchant and Mills pattern and I give it highest marks all around.  Clear instructions and the pattern drafting is superb. Mike models the coat below;

IMG_9650.jpg

While I took my time- because this was a special make- this coat went together easily and smoothly.  The collar and facing construction are so well done.  Some reviewers of this pattern suggested lining the pockets- but I went with the pattern recommendation to simply turn the edges. I was totally on board with the unlined profile of this jacket and just went with it throughout.  I finished the facing edges with a neutral linen bias binding- which blends nicely with the earthy denim.

IMG_9387.jpg

I used a fabulous designer dead stock denim from Lakes Makerie that was absolutely a dream to work with- super malleable and sturdy.

Adam is 5’ 7”, so I shortened the coat by an inch.  Other than that, I made no pattern modifications- except adding a hanging loop.  Adam measures for a size 38 and that is the size I made- but in the end, I think he would have preferred a slimmer -more European fit.  If I made this again, I would make a 36.

IMG_9403.jpg

I love the subtle design touches- the extra-large pockets and interesting top-stitching detailing.

IMG_9666.jpg

I did a few other special- slow sewing touches.  For example, I made corded button holes by laying down and stitching over a length of topstitching thread see diagram below.  After you stitch the button hole, you simply pull the thread taught and trim. 

Are you also admiring those beautiful buttons?

IMG_9604.jpg

In my search for the perfect button, I found corozo buttons at Treadle Yard Goods. The corozo or tagua nut -which is a seed from a tropical palm- is used for buttons and carving figurines.  I read the corozo is sometimes referred to as vegetable ivory- so cool!  These buttons are absolutely beautiful and have a natural variation and are soft and smooth and soothing to touch.  So much better than plastic.

Before packing the coat off to send to Adam, I asked Mike to try it on for measuring the correct length for the sleeve- because father and son are surprisingly about the same size.  Mike tried it on and immediately gave me a puzzled look- because…. he pointed out…I put the buttons on the wrong side- or rather the left side, where I always put buttons when sewing for women. I was totally on auto pilot and temporarily forgetting that men’s wear has buttons on the right.  Rats!

IMG_9713.jpg

After pouting a bit, this gender-based button discrepancy piqued my interest.  Why different?!  So I did a little internet searching to find out the reason. While I didn’t come up with a definitive answer, I did find some interesting and crazy theories.  The craziest reason I found was that Napoleon mass-produced clothing that was intentionally difficult for women to put on.  Ha!  A more plausible reason is that in the Renaissance and Victorian eras, women’s clothing was complicated and wealthy women had assistance, so the buttons were on the right to make it easier for servants or family members assisting in dressing. Only the sharpest mind will notice. And the glass half full part of this story is it will keep Adam ambidextrous.

IMG_9670.jpg

Riff on a wrap

My most recent wrap dress was pretty traditional- but my second wrap project has some cool and new elements:  notably the d- ring closure and the super straight silhouette.  This is the Utu skirt from Named pattern’s Breaking the Pattern. I have been steadily working my way through this gem of a book.

IMG_0156 (1).jpg

Wrap skirts - maybe even more than the wrap dress- are a crowd-pleasing wardrobe element. I have owned several- and they were also the run-away FAVORITE beginner sewing project when I was a student. When I went to middle school, female students were REQUIRED to take a sewing class and many chose to make a wrap skirt-remember: no zips and no buttons- but none were as cool and stylish as the Utu.

IMG_0146.jpg

I love the look of this quick and easy to make skirt. Be forewarned- you will need to curb your gymnastic moves as there isn’t a lot of fabric overlap on this wrap.  This skirt looks fabulous when standing at attention- or practicing your mountain pose (Namaste), but pay attention when bending or leaping.

I used Robert Kaufman Jetsetter twill- which has a little stretch and great recovery- from Fabric.com

The skirt is high waisted which is adorable on the pattern model- but I am long waisted- and short on the leg front.  So I modified the waistline by adjusting the darts. 

IMG_0195.jpg

I had this blue and white stripe in my stash- of unknown origins and unknown – or long forgotten -fiber content. One thing is clear- it is not cotton and it is fairly stiff. The fabric properties didn’t exactly match my idea for the top- but the color was a perfect match for this blue skirt- so I improvised…the sleeves may need modification.

IMG_0196.jpg
IMG_0153 (1).jpg