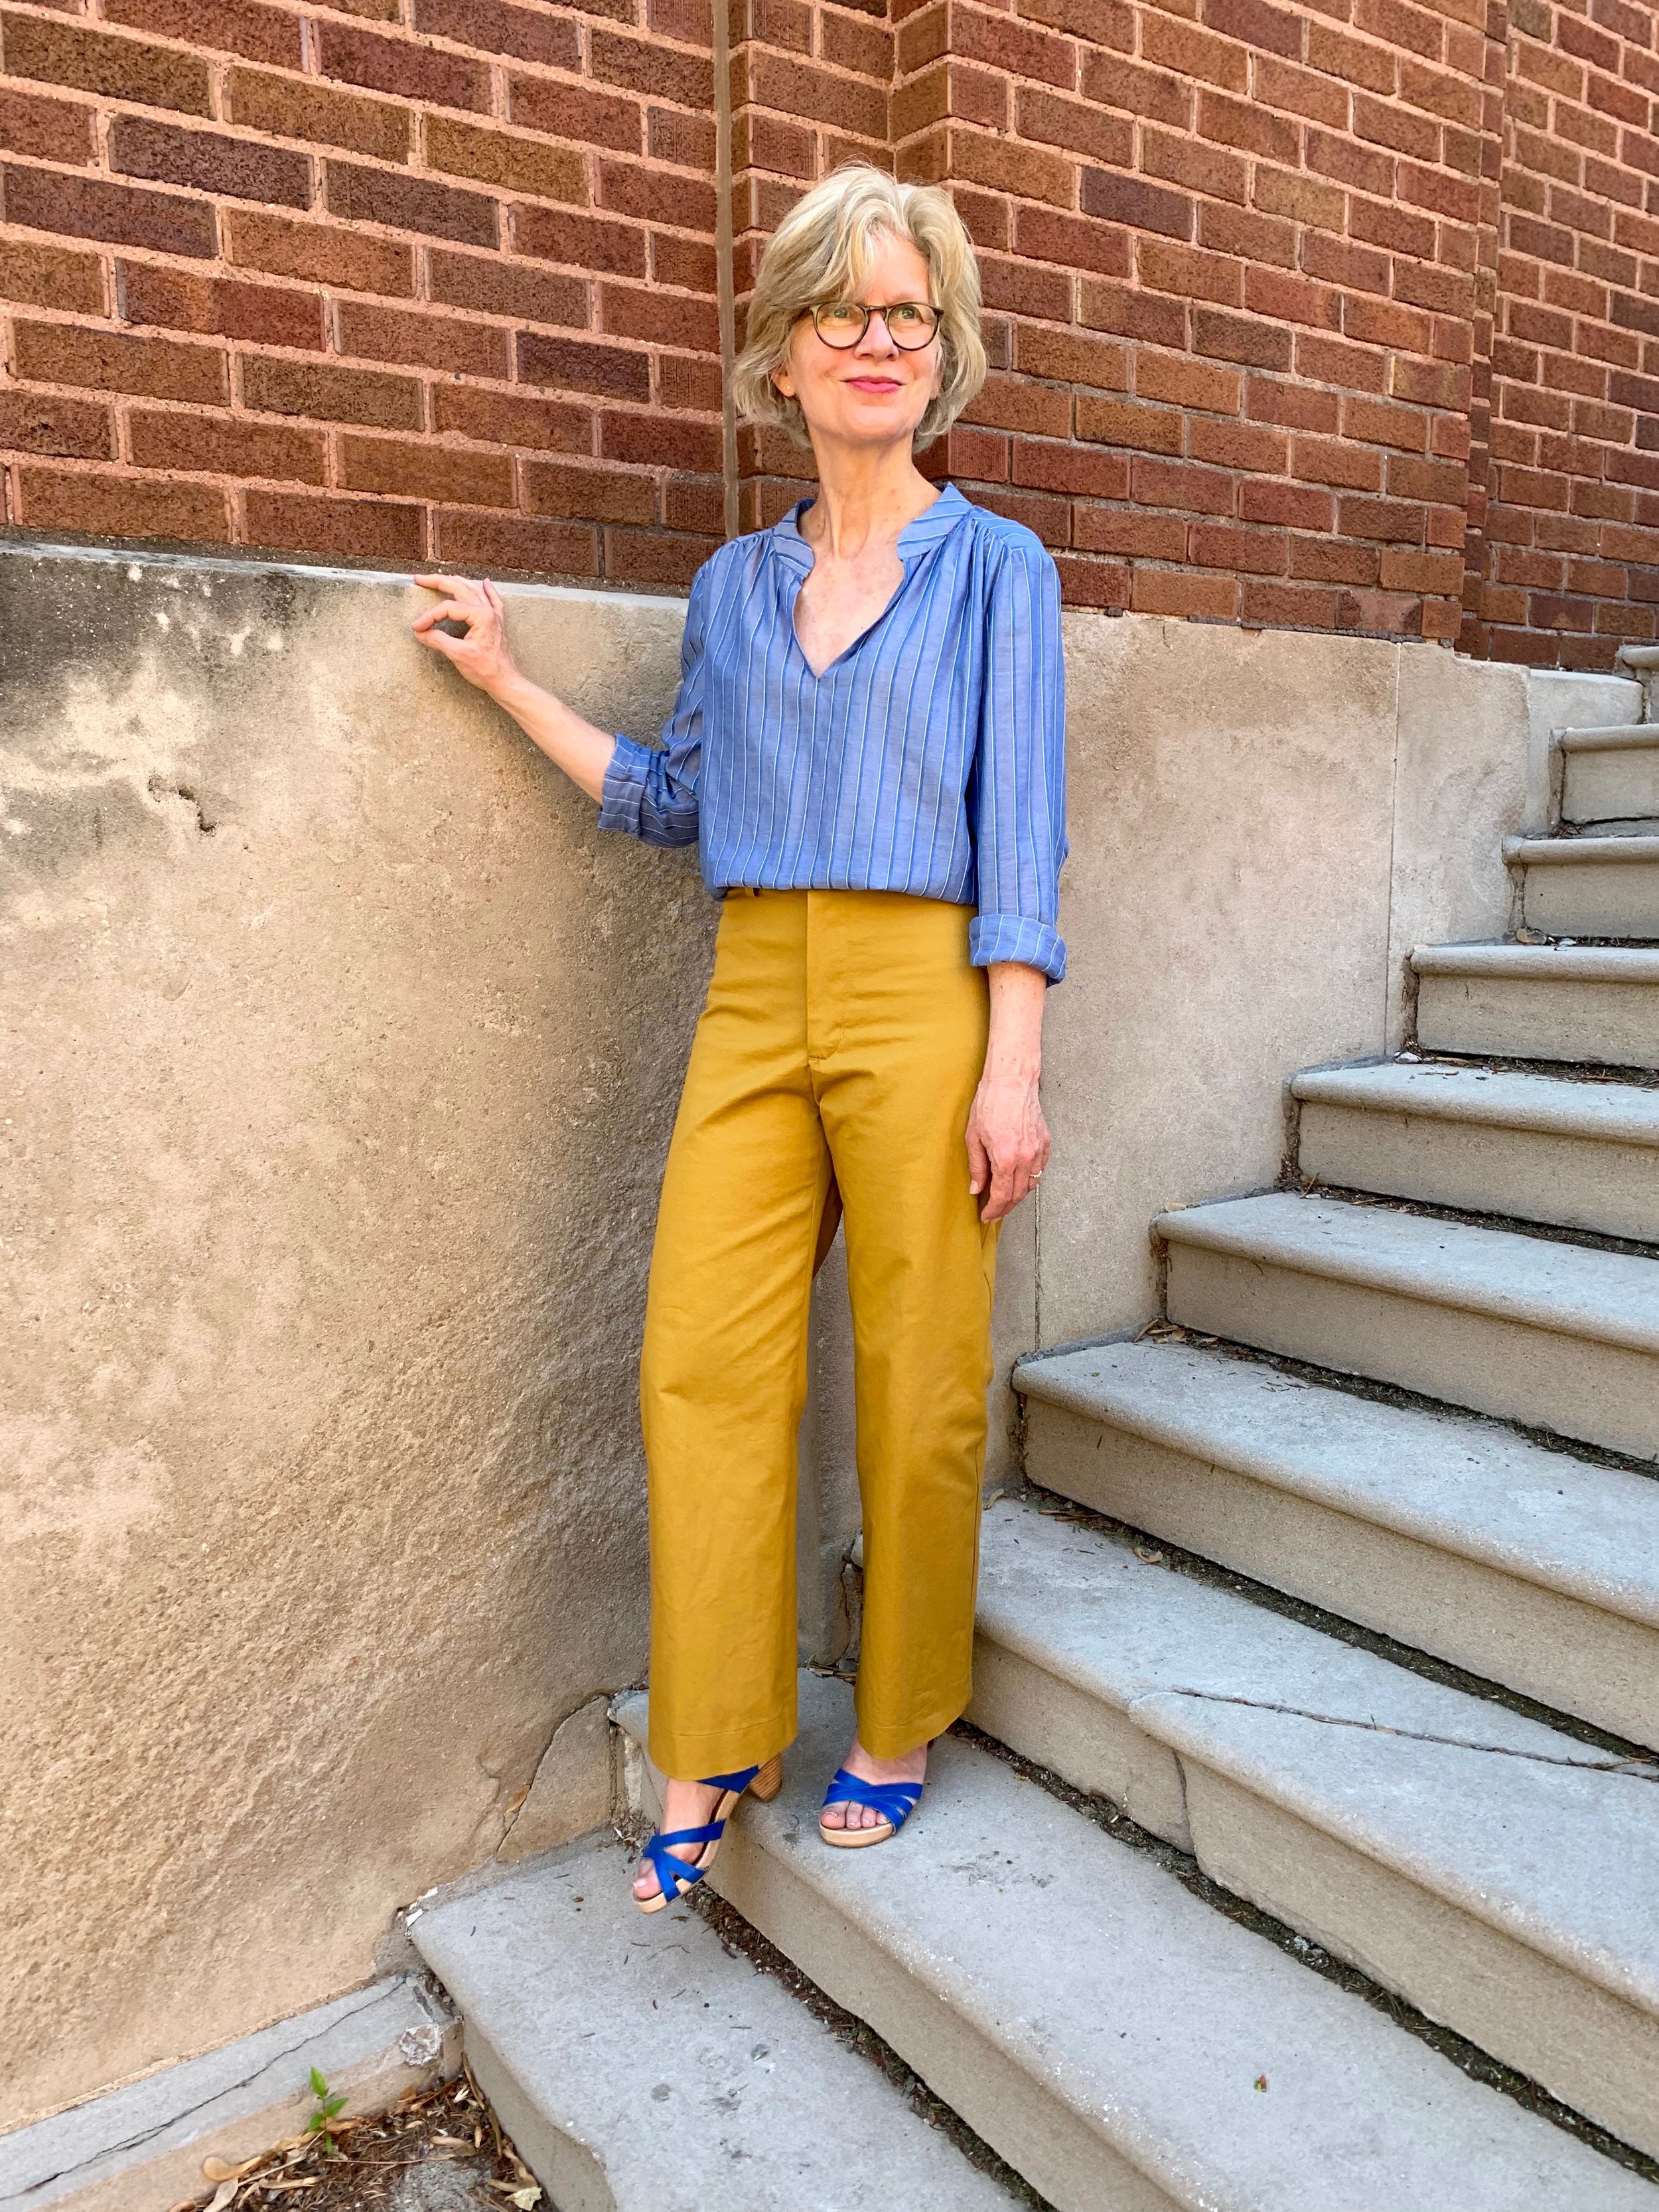
Ahoy! Romero trousers and sewing friends

Ahoy!  Several weeks ago, Instagram friends from across the globe- @suestoney @sewing_in_spain  - asked me to co-host the “Make a Garment a Month” (MAGAM) sewing challenge on Instagram in April.  No need to ask twice- it’s been a long and socially isolating winter, and I was more than ready for some sewing camaraderie.   And even though I’m more than used to conducting business and socializing online this year- it was a real thrill to have a Zoom meeting with Suzy and Sue over three continents: Europe, Australia and North America.  The guest host gets to pick the prompt for the monthly sewing challenge, and since my sewing daydreams were most recently filled with nautical style, I pitched April Ahoy as a theme.

I have a longstanding crush on nautical style.  Maybe it was all those J. Crew mail order catalogs I used to get in the 1980’s where everyone looked so healthy, fresh and happy. Nautical looks are timeless and suit everyone- they are gender and age neutral.  I love, love, love striped tops (and striped dresses), boat neck styles, pea coats, brass buttons- anything in the color navy! When I was in high school, I actually owned a full on navy sailor dress complete with a white sailor style collar and red neck tie. My long-time maritime romance is puzzling – as I am a lifelong resident of Minnesota- smack dab in the middle of the continent.

IMG_1771.jpg

For my nautical project I made the Pauline and Alice Romero sailor style trousers which I’ve made before - and I blogged about here. I always felt they were a little snug and I wanted to give the pattern another try to get a better fit.

FullSizeRender (3).jpg

There’s more than a few theories out there about the evolution of the wide legged sailor pant.  Some say the wide leg could be easily rolled up so feet and ankles were free from getting tangled while working on the rigging of sailing ships. Another theory is that rolling the pant prevents it from getting wet when swabbing the deck. One actual, practical use of the pants is as a life saving device.  If you have to abandon ship or fall overboard, you can easily remove the wide leg trouser, tie the legs in a knot and inflate the trousers with air.  Making pants into a flotation device is something I actually practiced in a water safety class when I was young.

FullSizeRender (2).jpg

Back to my pants project.  I used a twill fabric which had some stretch that I purchased a while back from the Fabric Store.  I cut a straight size 40.  Then, I carefully followed the excellent instructions for adjusting for a full backside provided by Colette- here

IMG_0067.jpg

Armed with colored pencils and a ruler- it was pretty straightforward to add some leeway to portside!

IMG_0068.jpg

And I achieved a ship shape fit after the adjustments!

FullSizeRender (1).jpg

To finish, I scoured my button collection and came up with almost enough brass buttons for the pants- there is one orphan button- still nautical though.

FullSizeRender (4).jpg

I am super pleased with my trousers- but the best aspect of this project by far- was the fraternizing fun- especially all of the nautical puns -shared with co-captains Suzy and Sue.

That 1980s Feeling- Designer Vogue and Pink Landers for Fall

I recently took a gander through my old, old patterns and found this Vogue American Designer pattern from the 1980s.  How about those sleeves?! So is this vintage? or retro? Whatever the term, it is most definitely awesome and not at all outdated.

IMG_2316.jpg

Yes- I was alive in the 1980s; and yes- I was sewing clothes for myself way back then.  I still remember -vividly- how great I felt in the dress I made from this pattern even though I don’t remember much else from the 1980s. I was in graduate school and a newly-wed during that decade. I do remember the Police, Talking Heads, shoulder pads, E.T., Duran Duran, Dirty Dancing, mullets, The Breakfast Club, big hair, arcade games and Madonna. I have seen the 1980s referred to as the greed decade- which might have something to do with the size of those sleeves- among other things.

I decided that another go-around with this pattern in a new century might recapture that great 1980s feeling- minus the greed part. Plus, I love how aspects of this pattern still feel modern and current.

IMG_2231.jpg

I remember my first dress out of this pattern was a black and red print. And I know I sewed the pattern view B. This time around, it was easy to modify the pattern to create a spiffy knit top.  I simply widened the bodice from the bust-line and lengthened it slightly. 

This fabric is a very drapey knit from Treadle Yard Goods- so the sleeves did not turn out as voluminous as the first dress I made.  The pattern also calls for a sleeve cap header, that I remember making out of interfacing as a shoulder pad stand in- but I skipped that step.  I also modified the pattern to button on one shoulder, and sewed the other shoulder closed. Finally, I eliminated the button cuffs for the sleeves and simply attached sleeve bands.

IMG_2313.jpg

I actually hand hemmed this top- because I wanted it to look pretty when worn untucked. Although, I found out I prefer how the top looks when it is tucked into these newly made Landers.

IMG_2163.jpg

The pants are stripped down True Bias Lander pants with the zipper expansion.  No pockets anywhere. The fabric is a soft and comfortable- albeit a tad wrinkly- Robert Kaufman all cotton twill from Fabric.com.  The Lander pants are a great fit for me.  I blogged about these previously, you can get all the details here.

Pietra pants- with zip

So, I succumbed to the siren song of elastic waist pants, again.  The enticement of elastic waist pants is hard to ignore.  Who doesn’t want to live in stretchy waist accommodating comfort?   Yet, if I am looking for a pant that fits well and is complimentary- I find elastic waist pants prove as difficult as fitted pants to fit the bill.  Because, here’s the thing: all that fabric and ease- which provides so much comfort- is not super flattering gathered around my mid-section. I have not yet found an elastic waist pant pattern that I would make again- that is until I made up the Pietra pant which is part of the new Rome Collection by Closet Case.  I already have another pair on the cutting table.

IMG_0871.jpg

There were some obvious design elements that suggested the Pietra pant might be more flattering than my past elastic pant makes. I love the front seam and clever straight-cut pocket. Also, there is a flat front with elastic only in the back. Even so- I made several modifications to this pattern because - well it’s typical for me.  First, I took an inch off the top of the front and back. I like my pants to sit at my mid-section- not above.  I also reduced the waistband to accommodate 1 ½ inch elastic instead of 2 inch- partly because it was what I had on hand, and partly because that seemed wide enough.  I shortened the front crotch after checking for fit, because it was necessary.

IMG_1017.jpg

The most significant modification was adding an invisible zipper on the side- an idea first used and blogged about by Mia at Sewnorth here- thanks for the inspired idea!  When I tried the pants on for fit, I didn’t like all of the fabric and fullness in the rear.  So, I reduced the fullness by taking in the center back seam.  However, reducing the fullness made the pants a bit too tight to wiggle into them.  An invisible zipper solved the problem and makes the pants pretty perfect. See side zipper glam shot below.

IMG_1109.jpg
IMG_0962.jpg

I used a denim chambray from Lakes Makerie as a wearable toile, and while the fabric color and weight is fabulous, I worry they won’t be super sturdy.  That’s why I feel rushed to make another pair.

IMG_0847.jpg

The top is the trusty Colette Laurel without back darts.  The fabric is such a winning Scandi print that I found from Juniper Blue Textiles. The print is so cool- I didn’t want to distract from it with a more complicated pattern.

Wearing the pants: True Bias Lander

Wearing the fabulous Lander pants- finally!  You might be thinking I am rather late to make the infamous, celebrated, honored, and lauded Lander pant by True Bias- and you would be correct.

IMG_6795.jpg

The thing is, I am a bit biased to making dresses. I absolutely love making and wearing dresses.  And, truth be told, I don’t know if I ever had a pair of pants ready made or otherwise that were truly comfortable, flattering and well-fitting.  But that was before I made the Lander pants.

And here’s a bit of a dress-making back-story.  I grew up in a small town and I wore a uniform –a simple plain blue pinafore- to primary school every day.  Besides a few play outfits, I didn’t have many other clothes.  I dreamed of owning and wearing a closet full of dresses. Because there weren’t many ready-made dress choices in my little town and funding was an issue, I figured the best way to accomplish my dream was to learn to make dresses for myself.  So, I begged my Mom to teach me to sew.  She put me off until -left to my own devices at my grandma’s with a swath of fabric, scissors, and access to her ancient sewing machine one lazy Sunday- I made myself a dress.  When my Mom came to pick me up and I was decked out and proud in my completely self-drafted cobbled together hand-made dress- she finally agreed to teach me to sew.  And my dressmaking odyssey began.

So- back to these Landers. These pants might rival some of my favorite dresses and convert me to a lover of pants.  They are comfortable and the pattern is so flattering.  And they are pretty close to a perfect fit.   I did not make a muslin and I would only add a few fitting tweaks to the next pair.  These are probably my best fitting pants right now.

IMG_6737.jpg

The pattern is well drafted and the instructions are clear and straightforward.  This pattern is definitely deserving of the praise and legions of followers.

Amazingly- I discovered the Lander sizing is very close to my measurements.  Extra bonus- this pattern is drafted for a 5’5” individual- just an inch taller than me.  And although a muslin is recommended- I felt so encouraged and emboldened by these similarities- I simply cut a size 6 and went for it.

I used the Lander fly zipper expansion- I like the clean look and don’t want to fiddle with buttons on the fly.  The zipper pattern and instructions were clear and easy to follow. I also eliminated the pockets- because I may be one of the few people out there who is ok without garment pockets and I am always looking to reduce midsection bulk- both front and back.

The Jetsetter Twill I purchased from Lakes Makerie turns out to be the pant fabric of my dreams.  This is such an awesome color and a perfect weight and smooth twill face.  The fabric has stretch-love that in pants- with great recovery- no bagging out.

IMG_6858.jpg

The shirt is a mash-up: self-drafted somewhat including bits and pieces of various patterns.  It is not super successful so it doesn’t deserve a discussion except to note that the fabric is the best, lightest weight, silky cotton lawn- purchased from Mood Fabrics.. 

IMG_6797.jpg

Style Arc Tully for the carry-on

Whenever we take a trip, I almost always sew something new.  Travel typically means a different climate and always means non-work wear clothes. So, I consistently seem to need something to fill a gap in my existing wardrobe.  That said, and as much as I have a closet full of clothes- I am truly a light packer.  For trips that last 5 days or less, I often just take a regular backpack.  For trips up to 10 days, I use my larger 55 liter backpack.  When we return home from an overseas trip- customs agents almost always ask me where my luggage is.  Ha! 

We recently had a very spontaneous opportunity to take a quick warm weather break.  I wanted/needed some light linen pants that would do double or even triple duty and be great for the beach and for sight-seeing and would provide winter white leg coverage and sun protection.  Important!

I had two days to get this done, I used the Style Arc Tully pattern that I owned – having made these up previously for my daughter.  I wanted simple elastic pants, and I appreciate the flat front and paper-bag waist features of the Tully. 

I found the perfect blue linen fabric from my local and fabulous fabric store: Treadle Yard Goods.

IMG_3499.jpg

Nicely pressed pants pictured above in my dining room and below while on delightfully warm holiday, all rumpled and beach ready.

IMG_2277.jpg


And yet another shot back home on the porch. Note, I modified the Tully because I wanted a loose wide leg.  This was simple to draft from the Tully. I simply drew a wider leg- following the grain line marking on the pattern- see second shot below. 

IMG_3364.jpg
IMG_3705.jpg

And, in conclusion, a short story about the face hiding handmade hat. This hat is self-drafted- I copied an REI brand hat that I have had forever with a perfect not too big, not too small, just right brim.  I used buckram inside the brim – but next time, I will use another layer -or find something even sturdier- for more stiffness.  All the better to see!


IMG_3488.jpg