Desert Performance Ruska

This is my first bona fide performance wear top!

IMG_7479.jpg

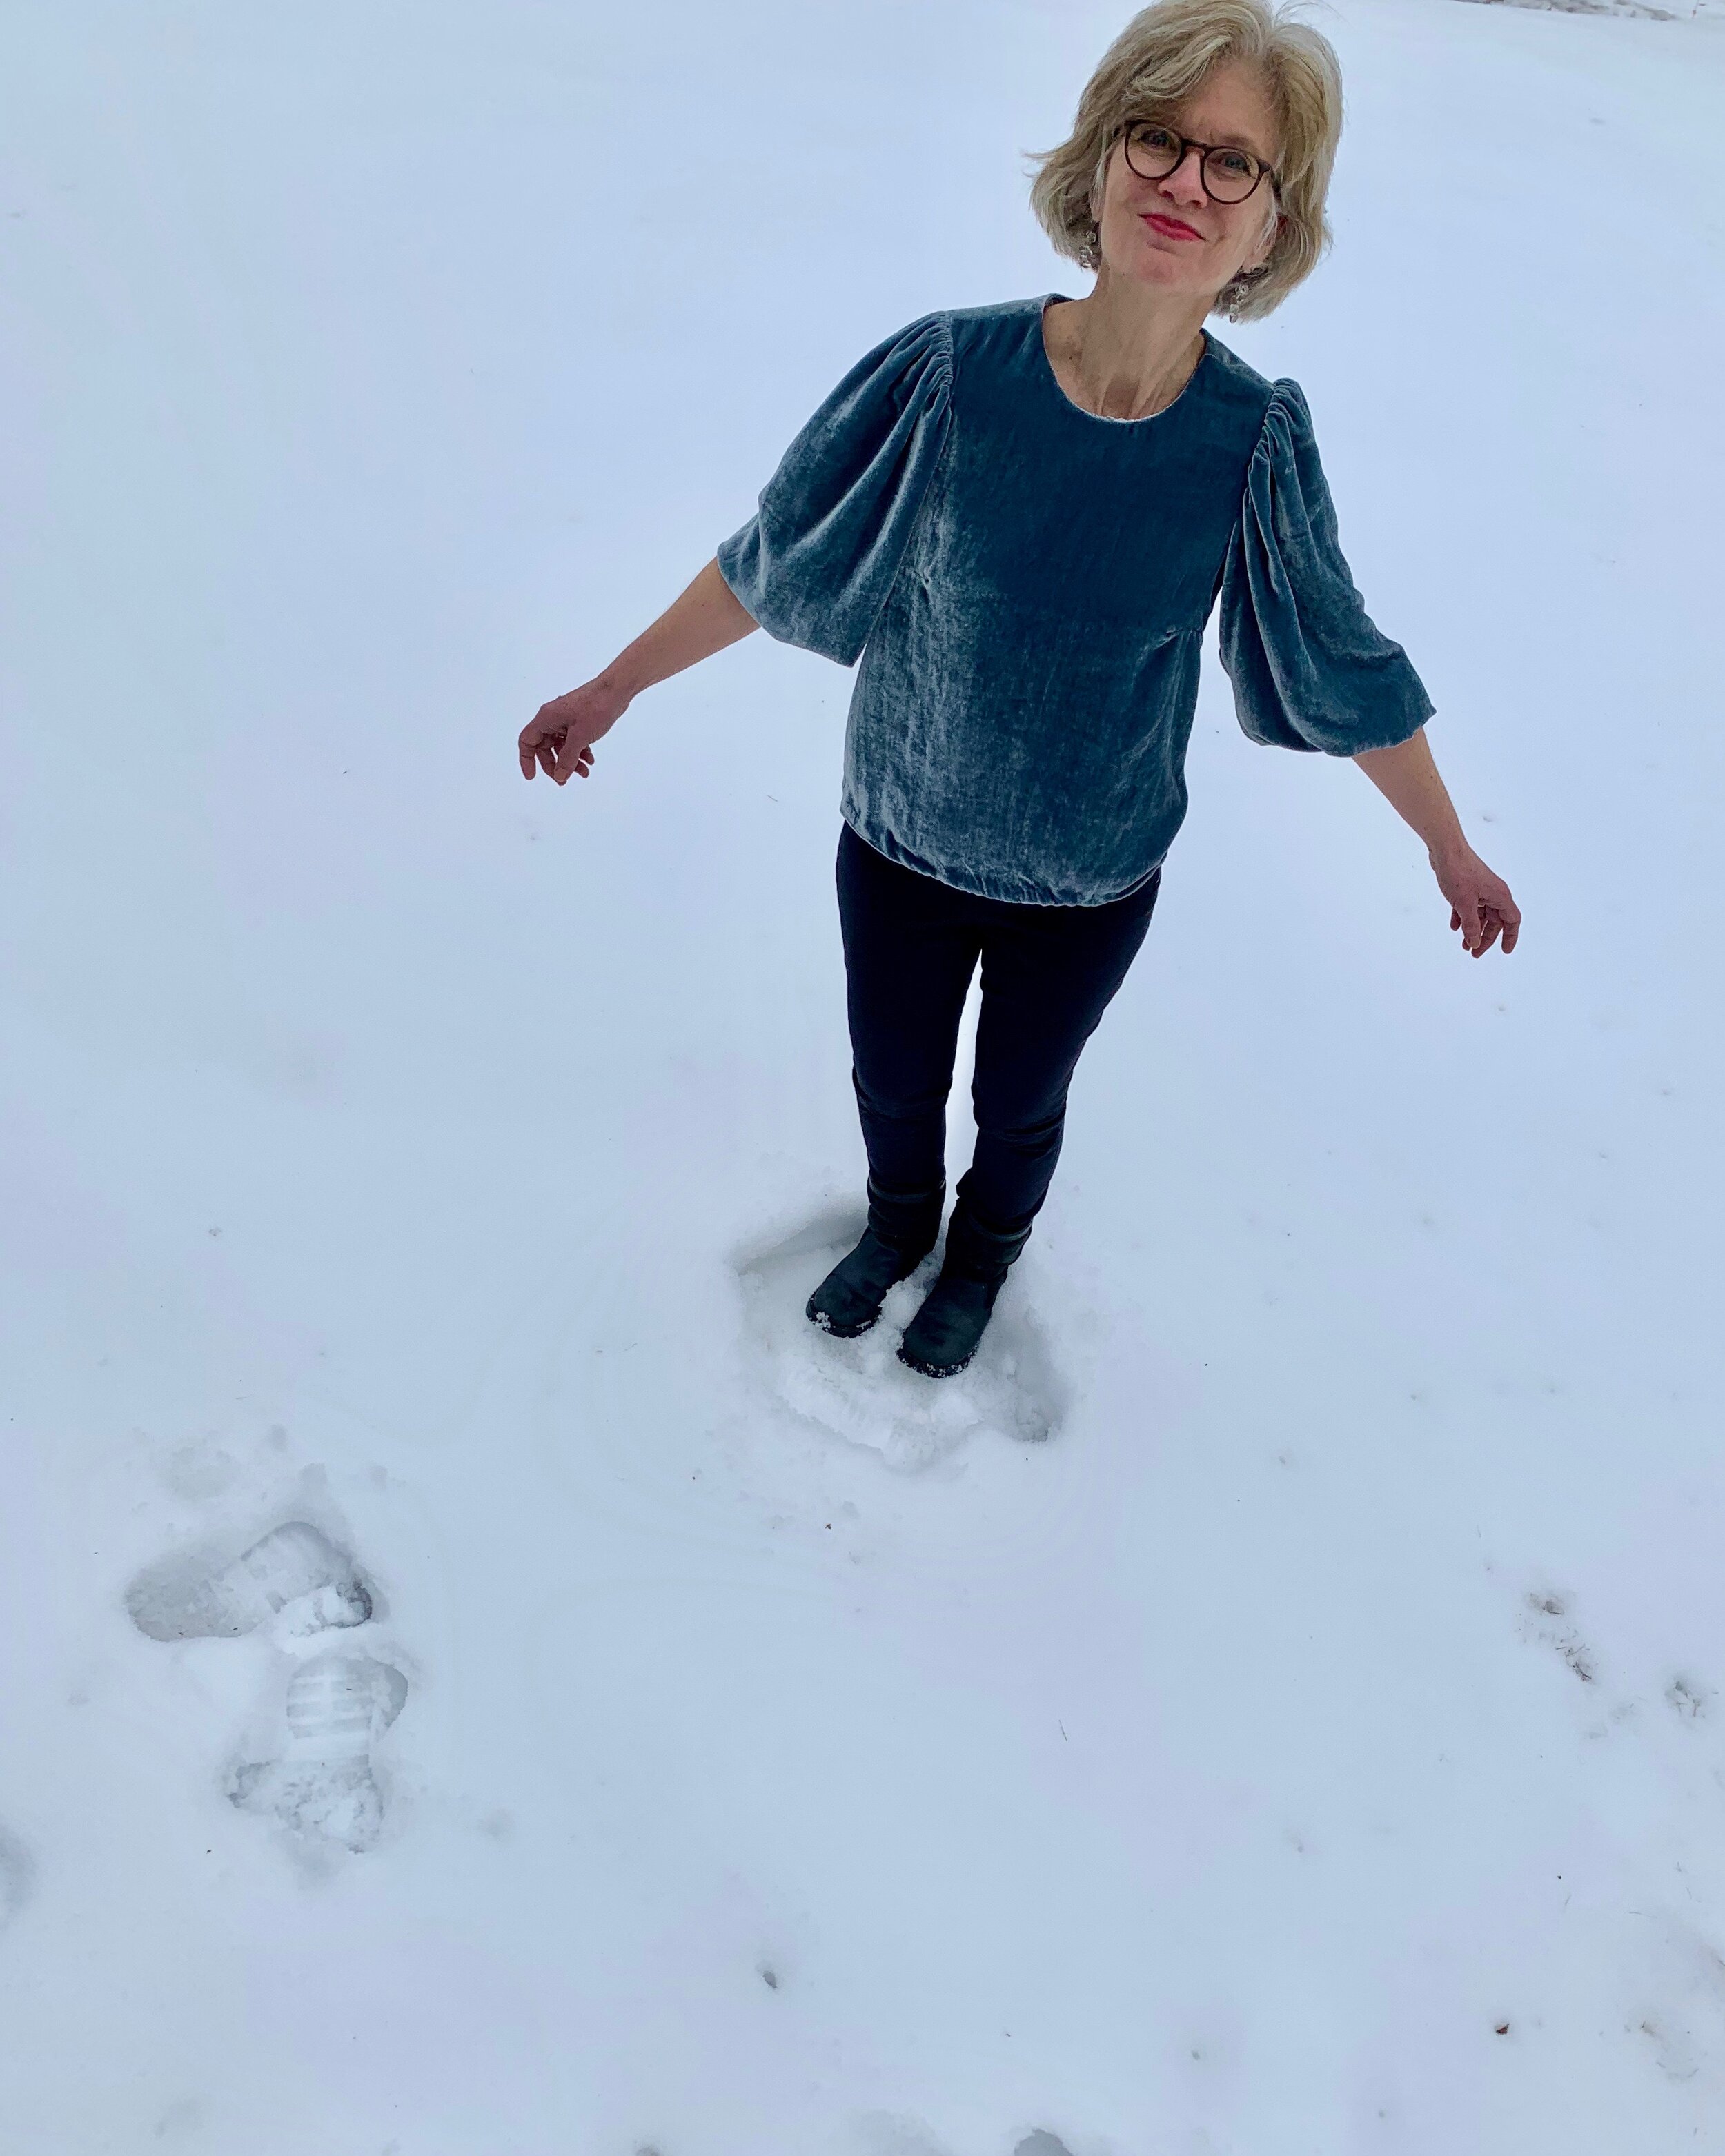
I needed a long sleeve active wear top for a holiday weekend hiking trip in Joshua Tree National Park. Desert weather can be harsh- and I need both sun protection and climate control.  Desert climate and making active wear are both pretty foreign to this Northern girl- so where to start?

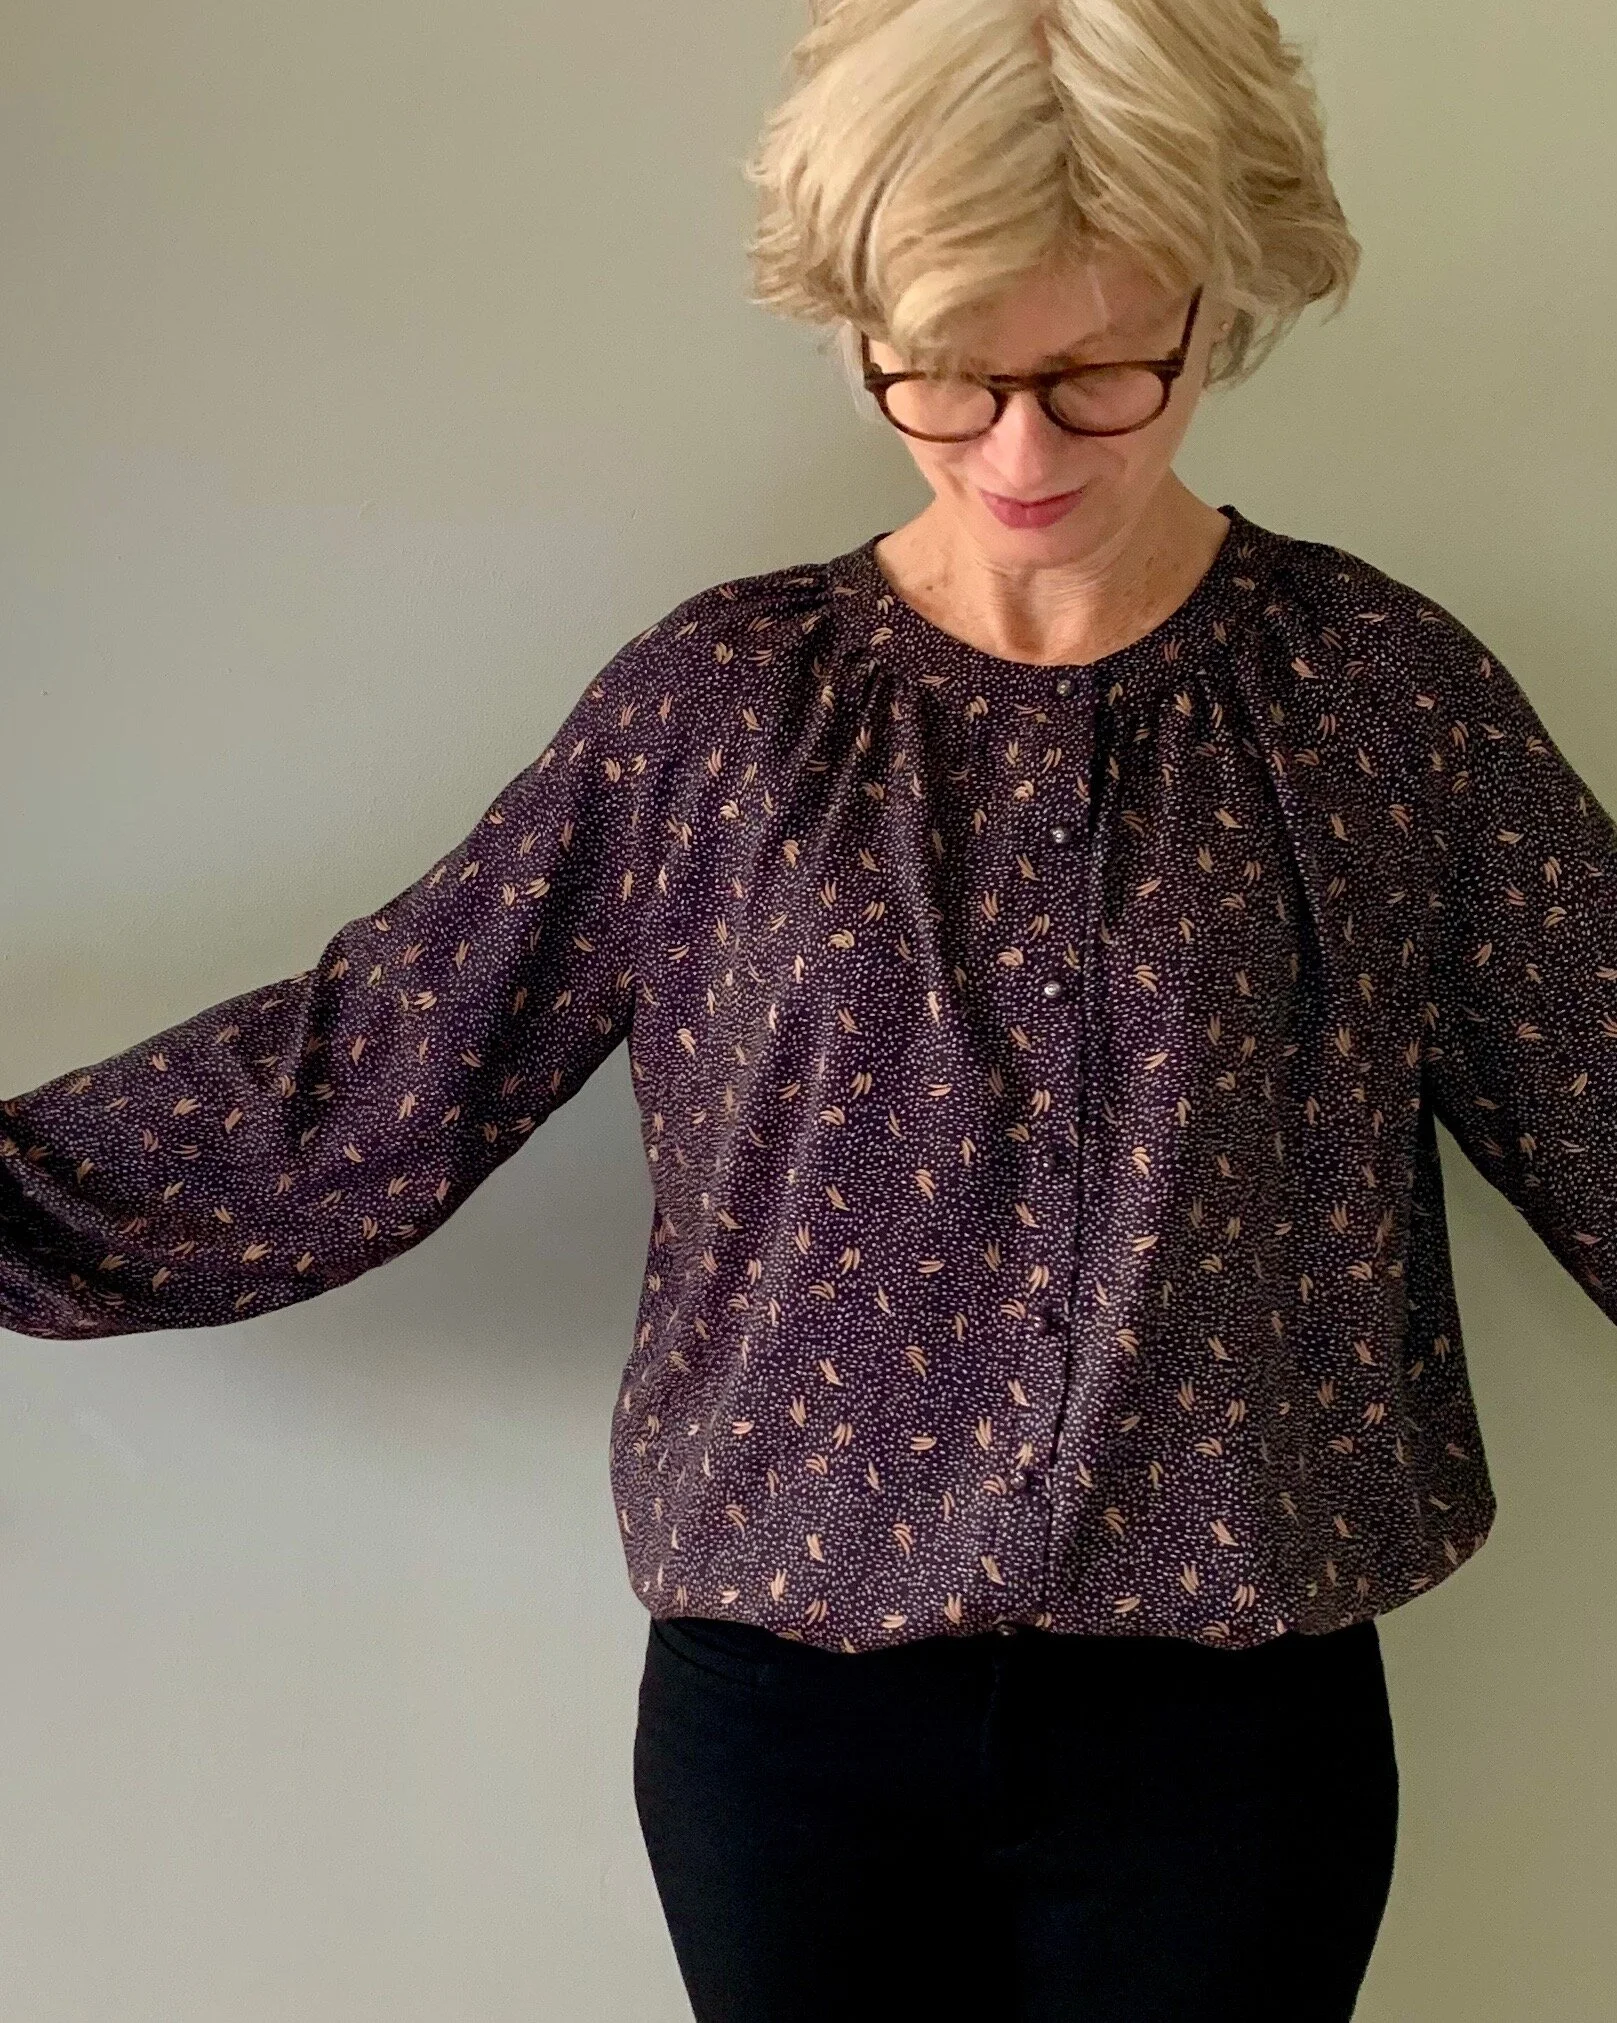
To simplify things, I chose my favorite t-shirt pattern from Named Clothing Breaking the Pattern book- Ruska.  I made four Ruska tops this past year, including two merino wool Ruska tops which are absolutely suitable for active pursuits.  But this latest make turned out to be next level active wear.

Fabric choice was a big question mark.  I know my way around natural fibers- since that’s predominately what I sew- but active wear fabric is another ball game.  So, before buying, I did a little research.

I knew I needed a fabric with wicking power.   This is true even in our cold weather climate here in Minnesota.  Wicking means the fabric wicks moisture away and the fabric doesn’t absorb moisture- so after exertion (and sweating) you stay dry and comfortable.  You want to avoid-sweating after a run or climb and then getting chilly because your shirt is wet.  Wicking fabric also acts as a good insulator. Note the snow in the desert below.

IMG_0106.jpg

Wool is a wicking fiber; it wicks water from the body.  However, wool doesn’t dry as fast as some synthetics because the wool fibers absorb moisture.  Polyester is a core fiber for athletic wear because of its moisture control benefits:  it both dries rapidly (it doesn’t absorb moisture) and it wicks sweat from the body due to the yarn structure. Nylon has the same moisture control properties. In addition, nylon is also super strong and abrasion resistant- or long-lasting. Note, nylon is more expensive than polyester.

Stretch is the other key quality for performance wear.  Again, natural fiber knits have stretch, but special stretch fibers provide four way stretch capacity, and/or better recovery- read- no bagging.  So for performance fabric stretch, the fabric should contain Lycra, elastene or spandex.  One active wear designer recommends the fabric contain at least 12% Lycra, spandex or elastane to give you performance level freedom of movement.

This particular performance wear fabric is from Fabric.com.  It is described as an athletic medium weight double knit.  The description suggests it is “perfect for athletic tops, leggings, low impact sports bras, dancewear and swimwear.”  That pretty much covers all the performance bases.  The fabric content is 75% polyester and 25% Lycra- which is plenty of Lycra for a maximum range of movement. Bonus- it’s a floral, for cute desert hiking style. Another bonus quality of polyester is it’s color vibrancy and ability to hold color- which means this fabric will continue to blossom brightly even after many desert suns.

IMG_7767.jpg


Sewing with this athletic knit was a stroll in the park.  The knit is super stable, absolutely no raveling or curling. I sewed this up on my regular machine with a straight stitch even though I have a zig zag option on my machine.  When sewing knits, I simply increase the stitch length slightly to 3 mm and hold onto the fabric both in front of and behind the needle.  With both hands, I pull the fabric very slightly -and gently- as it feeds under the presser foot. And that’s it. 

IMG_7518.jpg

Happily, this beauty performed outstandingly while covering approximately 10 miles in one day and comfortably withstanding wind and sun and changing temps. I plan to make some bottoms out of this fabric soon.

Blue Velvet- for Spoolriver’s first birthday

Here I am dressed up in velvet in honor of the one-year anniversary of my blog.  Happy Birthday Spoolriver! Am I impractical to be wearing Blue Velvet (cue Bobby Vinton)? Absolutely not!  Am I involved in a noir mystery directed by David Lynch? I don’t think so! No, I am simply honoring a monumental year for me. And, actually, this was a private party.

IMG_7461.jpg

So, here is why velvet is a practical party top.  I wore this top on Christmas Eve and Christmas day and was absolutely comfortable- even while sweating over cooking and serving sit down dinner for 13 and organizing next day’s pot luck dinner for 36!  And, unlike the sequined top I made for New Year’s Eve- I don’t leave a trail of sequins wherever I roamed.

I was struck by this beautiful blue silk velvet at the Fabric Store and knew it would be perfect for festive winter occasions.  Velvet may put people off, and I admit, it can be a little finicky to work with.  But silk velvet is both cozy and breathable -it’s a natural fiber.  It is sumptuous and luxurious, yet if you don’t lead a luxurious life- (read, I do the dishes) it is not precious.   I wash my silk velvet on delicate in the washing machine. And I wear it outside!

IMG_6663.jpg

I chose an easy silhouette for this fabric- which I recommend when sewing velvet.  Even though this is essentially a boxy top, I included subtle shaping with darts and gathers. This model is self drafted. Sewing velvet requires a little extra care because of the nap or fuzzy pile to the fabric.  There is a nice beginners guide to sewing velvet at Seamwork.  With this simple top, I really only had to take a few extra steps.

I make sure (double check) that all my pattern pieces are laid out on the fabric in the same direction- top to bottom of the garment.  I choose to lay them out the direction of the nap.  To figure out the direction of the nap, I simply run my hand slowly up and down the fabric- the direction that feels smooth is the direction of the nap or where the pile (or nap) is running down the fabric.  I choose that direction –pile running down- when I layout my pattern- because that’s what I was told- long ago.  But I recently read that you may want to choose the other direction (against the nap) if you want the garment to look more saturated. Whichever direction you choose, just make sure all pattern pieces are running the same way.

I use tailors tacks to mark darts or notches.  But- I typically use tailor tacks to mark- so this is no big deal

Last, I pin (with so many pins) all seams to avoid fabric creeping.  This is actually the most important precaution.  Velvet shifts when you sew it because when you put two layers of fabric- right sides together – the nap (pile) causes the fabric to shift against itself.  Trust me- it really moves- it may even be worse than sewing with slippery and shiny fabrics! I know the recommended and best way to avoid creeping fabric is to hand baste seams.  But I simply can’t be bothered with hand basting.  When I made my first silk velvet garment long ago, a sewing friend gave me the following advice: “Just pin the *&%$!# out of it.”  So that’s what I do- and it works for me.  I pin at least every 1/8th inch.

IMG_7464.jpg

The only other fiddly aspect of the top was the hem.  I originally hand stitched a hem- but the hemline looked all wobbly and terrible.  Here is the wobbly hem on Christmas Eve before the guests arrived.

IMG_6286.jpg

To improve the look, I simply added elastic to the bottom.  The finish is now both tidy and stylish and I like it better.

IMG_6518.jpg


Sequins to start a new decade

I love a festive “party in a top”- and if that top is covered with sequins- there is no mistaking that you are serious about having a good time.  During this holiday season, I did a lot of hosting- read cooking! I find it super practical to prep in jeans or black pants and a sweatshirt and then throw on a fabulous top at the last minute.  I made two party tops in December: a velvet top for Christmas Eve- because velvet is so cozy and luxurious in winter; and for New Year’s Eve, I made this sequined top. I started and finished it on December 28- in the nick of time to ring in the new decade. 

IMG_6852.jpg


I have never sewn with sequins or been tempted previously to make a sequined garment- it seemed out of my sphere. But this season, I was definitely feeling a sequins vibe - both from sewists and in ready to wear fashion.  This has been a year of sewing firsts, so I was all about ending 2019 with another new sewing experience.

IMG_6900.jpg

I saw a ready-to-wear top that inspired my top which I was able to fashion from a pattern I already own and blogged about- Burda 6914

I made three modifications to the pattern- simple! I changed up the pleats in front.  Instead of two larger pleats, I created 4 tiny pleats and centered them- see easy adjustment below.  Second, I lengthened and widened the sleeve.  Finally, I lined the top with a fabulously comfortable nude jersey lining.

IMG_6430.jpg

Sewing with the sequins was surprisingly easy- probably because the sequins on this fabric were very small.  The mesh backing was super forgiving. I simply sewed through the sequins with normal seams. I think the biggest hassle is the trail of sequins that is now strewn all through the house. Well- there are worse things than a glittery floor! I read a few tips posted by Tilly and the Buttons on Instagram that were super useful as follows:

  • Don’t use your fabric scissors when cutting the sequin fabric

  • I wear glasses and that was useful when cutting- because the sequins fly!

  • Line your garment because sequin fabric is scratchy

IMG_6901.jpg

Other good advice -that I didn’t follow because I was in a hurry- but I recommend -follows:

  • Cut pattern pieces from a single layer of fabric

  • Unpick or snip sequins from seams to make them less bulky.

IMG_6876.jpg

Although I didn’t follow the advice above, I think the top looks great. Again, my only complaint is the sequins scattered in nearly every room in the house. I don’t know if unpicking sequins would prevent the mess. But that may be worth the effort- if there is another sequined project in the future.

Trouble on the Silk Road and Vogue 1654

It’s not at all unusual for me to make a dress for an event, but when I put on eye make-up (and take off my specs)- you know it is a serious occasion.  Such was the case on Thursday for our big gala at work. This annual fundraiser was also a celebration of our organization’s 150 years of service and completion of a major housing project. This shindig called for extra effort: both a new dress and extreme power lash mascara. 

IMG_6112.jpg

I found this fabulous green silk at Treadle Yard Goods.  It has a satin finish, but it is much heavier- which is perfect for a winter event here in the North.  I had my eye on the new Vogue 1654 special occasion dress and here was the opportunity. Even though the pattern calls for stretch woven fabrics or knits- and even though I had a couple modifications in mind- the sewing and fitting part of this project was – shall we say- smooth as silk.

IMG_6116 (1).jpg

This pattern is a “custom fit” pattern sized for A, B, C, and D cup sizes.  The A cup bodice was a perfect fit right out of the envelope.  Hallelujah!  Thank you Vogue for offering a pattern with customizable cup sizing!!!   There is a lot of information out there for people who need to make full bust adjustments.  But, I find significantly fewer tips and tricks for modifications for us petite chested gals.  And- because I am a self-taught pattern fiddler- I struggle with making these fit adjustments.  Personal goal is to figure this out in 2020.  Anyway- no need to struggle with bust adjustments with this pattern.

IMG_6092.jpg

I skipped the pleat- by cutting the skirt front on the fold of the fabric- and omitting the pleat line.  I graded the skirt to a larger size to make sure I had enough walking and sitting ease. 

Now here is where we hit a minor bump in the road. It’s the day before the gala, and I try on the dress to determine skirt length for hem, and the sleeves are simply overwhelming. So I completely unpick the sleeves and recut them to be basically a fitted sleeve. It was actually an easy alteration- but I was working last minute- per usual. I also made the sleeves bracelet length- because- well, bracelets!

IMG_5269.jpg

More trouble: I was very careful with pressing the darts and seams.  I ironed on the wrong side of the fabric and used a press cloth.  But I was having difficulty getting a nice pressed finish- because the fabric is fairly stiff. 

So I increased pressure- and oops- the seam dart impression from the other side showed through.  So I skipped ironing the other dart.  As an alternative to the pressure, I used a bit of steam and the iron dripped and suddenly I had water spots, discoloration, change in texture- and almost every other fabric disaster!!! And this is the evening before the event.

IMG_6107.jpg

I went to the internet and found a thread that suggested when pressing silk satin- generally a warm, dry iron and light pressing is best.  Hmmm.  The post recommended using a seam roll and brown paper strips to avoid seam and hem impressions which may show on the front of the fabric.  This seems like great advice, but I didn’t go that far- I only had an evening to finish- and actually, the hem looked fine with a wrong side pressing.  And while the water spots are basically invisible, I had the most trouble with photos and crease lines!

IMG_5774.jpg

I remember reading somewhere- long ago that workers who steam and press in the tailored garment industry make more money than the workers who sew. I have never been able to substantiate this – but it makes sense to me. I really struggle with the iron. I don’t know if ironing can be taught- but I could use a lesson.

In any case- despite a few bumps along the silk dress-making road, I learned a few things and am still pretty pleased with the final outcome!

Fluent in French- Blousette Rose in Atelier Brunette

It seemed appropriate to use a French pattern for my first project with the much admired Atelier Brunette viscose.  My spouse is fairly fluent in French. He studied in France twice and has attended a biweekly French conversation breakfast group for the past 30 plus years. I took some French language and culture classes in college, and we have hosted my spouses’ French friends and their children at our house numerous times over the decades.  Given all this, I may have been a bit over confident in my cross cultural abilities, when I went ahead and purchased Campanule- La Chemise Bohème- as a pattern down load- fully aware the pattern maker Blousette Rose didn’t offer the instructions for this pattern in English.

IMG_4184.jpg

The first little bump was trying to figure out whether the pattern pieces included seam allowances. My language skills were useless- but a quick Google search confirmed they didn’t- Merd!

The instructions are comprehensive and helpful- especially if you speak French. I particularly like the nicely drawn diagrams that are included.

Screen Shot 2019-11-07 at 5.51.28 PM.png


The instructions also include links to video tutorials- which I checked out. These videos are well done and helpful even if your French language skills are petite- like mine. So, I give this company high marks and no complaints about the pattern instructions- but I give myself a “fail” in my French reading comprehension. Fortunately, this blouse isn’t tricky and I have made a fair number of blouses- so I didn’t really have any problems.

IMG_3938.jpg

 This is my second go around with a French pattern maker- and I found this brand to be quite generous compared to my previous experience.  The sleeves and shirt length were too long for me by two inches- I am 5 foot 4 inches for reference.  The cut is also very generous.  My neckband didn’t lay as flat as I desire- which may be a drafting issue or may be user error- or maybe something was lost in translation.

IMG_4038.jpg

 A word about the fabric.  I found the Atelier Brunette fabric worth the hype.  J’adore!  I tossed it in the wash on gentle to pre-shrink- and it came out perfect.  After wearing the blouse- wrinkles hang out like magic.  I also found the viscose stable and easy to handle when sewing. 

 It was a bit of a challenge to find buttons to match the lovely midnight background on this fabric.  Navy is too bright and black is  – well -- too black.  I found these adorable buttons online that are actually branded Atelier Brunette- so I was able to order with no worries.  I think they are perfect for this shirt.

IMG_4273.jpg

Update- I noted recently that Blousette Rose now offers a small selection of their patterns with instructions for English speakers- but not the Campanule.